
How to Start a WordPress Blog

I started the website Tried and True Mom Jobs with no previous knowledge on how to create a site or ANYTHING! I’m completely self-taught and believe ME when I say, if I can do it, you definitely can.
I’ve had numerous requests to share the process of how to start a blog, so I am going to share with you what steps to take, free resources to use, and the best way to create a successful blog.
This post contains affiliate links, which means I may receive a small commission, at no cost to you, if you make a purchase through a link.
How to Start a WordPress Blog for Beginners
Step 1: Decide what to blog about
Many bloggers write about what they are passionate about. I’m passionate about moms being able to stay home, raise their kids, and make money because it’s what I want and I believe my findings won’t only help me, but can help others too.
Unfortunately, every passion you have won’t make you money. Scrivs from Obstacle.co says the 7 top blog niches that gain the most traffic and make the most money are:
- How to Make Money
- Personal Finance
- Health and Fitness
- Food
- Beauty and Fashion
- Lifestyle
- Personal Development
If you don’t know what to blog about, check out my video to help you narrow down your topic (MUST WATCH).
Quick question: Are you on our email list? If you want to follow my 6-figure blog blueprint to passively earn six figures every single year with your blog, click here to subscribe.
Step 2: Choose a Domain Name
You’ll want to really think about this because your domain name is so important. Make sure you consider the following when choosing a name:
- Easy to Pronounce & Spell
- Make it Short (I know, I know my domain name is a little long)
- Easy to remember
Check Namecheap to see if your desired name is available. This is the best (and cheapest) place I found to purchase my domain name, it’s all in the name “Name Cheap”.
Once you choose a domain name, create a Tik Tok, Twitter, YouTube, Instagram, and Facebook page so if you ever decide to use these platforms later your name won’t be taken.
Please note: I show you how to purchase your domain name if you have any questions in my step-by-step video in starting a WordPress website in step #4
Step 3: Get Hosting
Now that you know what your domain name will be, it’s time to get started! You’ll need to get web hosting. Why? Look at it like this; web hosting is like having a landlord. To live there (on the web) you have to pay rent but at a very low price.
Update: I used to use Bluehost and SiteGround to host my site but when my traffic continued to grow I switched to BigScoots. I mean, look at how crazy my traffic was this day (MIND BLOWN)
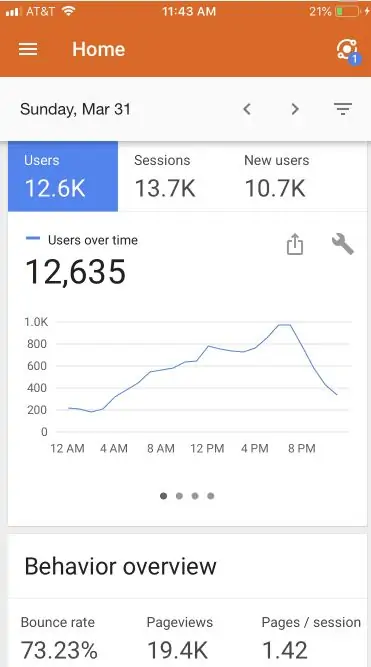
I had 19.4k page views in one day! I now get well over 200,000 page views per month but keep in mind, I’ve been doing this for a while.
I also had $400 days from Ads! I discuss this more in my article on How I Make Money Blogging.
Although I had no issues with Bluehost and SiteGround, it was time to move as my traffic grew.
As a beginner, I would recommend starting with SiteGround because it is a bit cheaper than upgrade to BigScoots as your website traffic grows. SiteGround is also offering a Huge 75% Off annual shared hosting plans. So you definitely want to take advantage of that!
I did a full tutorial on how to set your site up with Siteground in the next step.
Step 4: Find a Theme (aka Template)
I used the Astra theme to create my site for FREE! I recommend checking out my step-by-step tutorial to create a beautiful WordPress website that will make your site look like you paid a hefty price for it. You can do this yourself and I’m going to show you how.
Click here for my FREE step-by-step course on creating your WordPress website for beginners.

I highly recommend checking out the themes on Elementor, many of them are free and awesome.
Step 5: Install Your Theme
You can see how to do this in the video above.
Once your theme is installed, the fun begins! You can start writing.
Step 6: Change your Permalinks Settings – DO NOT SKIP THIS STEP
Before you get started posting anything, make sure your permalinks are set to this. Go to your Settings -> Permalinks -> Choose “Post name” and then save the changes.
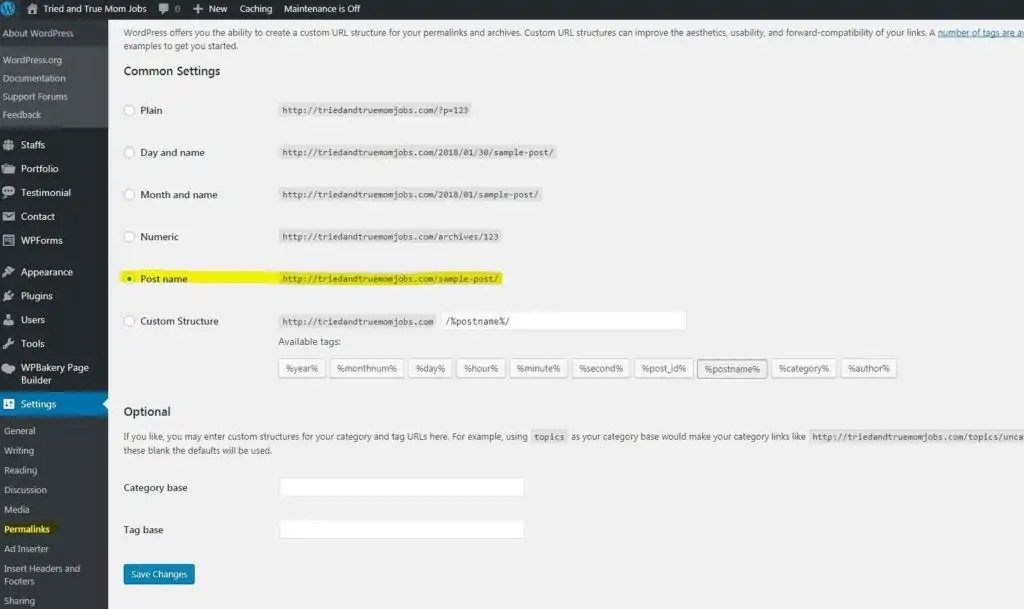
Note: When you write your posts, the permalink “Post Name” should be whatever keyword you are targeting if you are considering SEO.
If you’re writing a list post, i.e “5 of the Best Blog Posts” try to never put a number in the permalink. If the main keyword you are writing about is Best Blog Posts, let that be your post name. So it would look like this, triedandtruemomjobs.com/best-blog-posts.
Permalinks are permanent URLs for the pages on your site. They should never change, so it’s important to get it right before you start posting.
Permalinks should not include dates because the search engines use words, not numbers to understand what your content is about.
Step 7: Set up your email
Instead of having @yahoo.com or @gmail.com use your domain name. Like mine is [email protected]
I highly recommend integrating your website email account with your Gmail account or whomever your email provider is for a better user experience. Here are the instructions if you have Gmail.
More Tips to Get You Going Before You Launch Your Blog:
- If you’re on Instagram be sure to follow me here. I’ve been asked to share how I do it all with 3 kids and I’m happy to share my tips and tricks with you all!
- Keep it to yourself until after you launch. You’ll be pleasantly surprised how this will add value to what you’ve done. You will need others to bounce ideas off so create a small circle of positive minds and keep it small. You already have yourself that will give you doubts.
- Chop your paragraphs up for readability, no one wants to read a big block of text. You shouldn’t have any more than 2-3 sentences before you need to make a break/return.
- After you post your article always read it again on mobile to see how it looks because most people use their phones to read articles.
- ALWAYS keep your readers top of mind when writing. I constantly ask myself, would my reader want to know this, would they really care about that? and I always ask myself at the end of the article did I fully answer the question or cover the topic I’m writing about. And your answer should always be Yes.
- Look for the best opportunities to monetize your site through affiliate marketing, ads, sponsorships, and the list goes on.
- Create a Privacy Policy and put it in your footer, you can use mine for reference.
- Install Google Analytics to track the activity on your site.
- I worked with a graphic designer on Fiverr to create my logo for $10. Venom_hunt on Fiverr does AMAZING work, I wish I had used him when I was creating my logo. Mine is very plain, but I like it. You can also try logo ideas out on Tailor Brands, it’s very cool to see your logo come to life especially when you don’t know what you want.
The FREE tools I use to help manage my site:
Please note: I’ve updated the plugins I use for my website in this video so MAKE SURE you check it out here.
- Images: I use free stock photography websites like pexels, unsplash, stocksnap, and pixabay.
- SEO: Yoast
- Social Plugin: Sassy Social Share
- Email Campaigns & Capturing Emails: Mailerlite
- Creating Blog and Pinterest Images: Canva and Microsoft PowerPoint
- Proofreader: Grammarly – this is a great tool catching most of my grammar and spelling errors (most of the time, sometimes it’s wrong)
- Broken Link Checker: This plug-in has saved me many times because links often change and there is no way I’d know that without this plug-in.
Once your website is live, update Google Search Console. This is something you definitely want to do and here is a step-by-step tutorial that will help you set this up.
Are you on our email list? If you want to follow my 6-figure blog blueprint to passively earn six figures every single year with your blog, click here to subscribe.
I have completely enjoyed creating my website, and I’m sure you will too, it is very rewarding.
If you have any questions about starting your website, pop me a note in the comment section below…I’m happy to help!
You Might Also Like
How I use Pinterest to Drive Massive Traffic to my Website
How to Easily get Followers and Make Money at the Same Time
6 Affiliate Programs that Make April $6,000 a month!
