Do you know which bank is linked to your Income Tax refund? How to change bank account for Income Tax refund online? Let us understand this process in detail.
After filing an IT return, many of us eagerly wait for an income tax refund (if there is a refund). However, after few years, we may forget which bank account is linked to the income tax refund and if that account is no longer active, then how to change bank account for income tax refund online.
In such a situation, knowing the process and updating the correct active bank account for income tax refund is very much necessary. Before proceeding further, let us first understand how we can check the bank account that is linked to the income tax refund.
How to check the bank account linked to the Income Tax Refund?
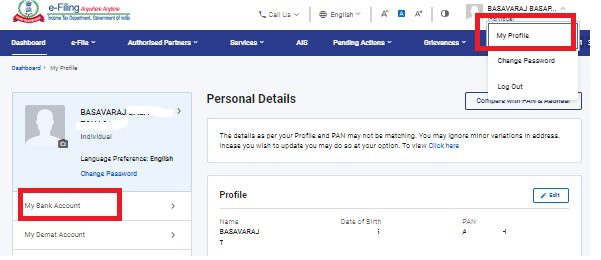
It is a simple process. Login to the income tax return filing portal of the Income Tax Department. After login, click on the “My Profile” tab. On the right side, you have to click on “My Bank Accounts” as below.
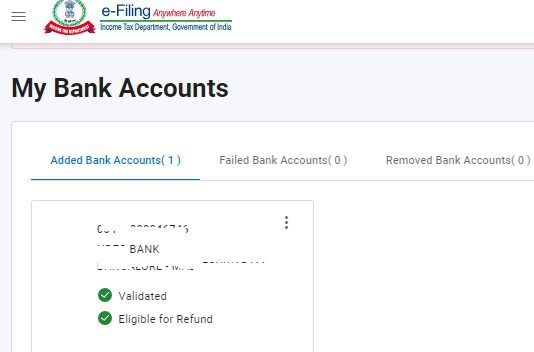
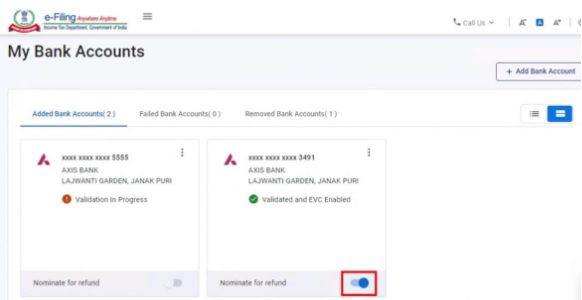
Once you click the “My Bank Account” tab, you will notice the three sections below.
Here, you will notice that there are three sections provided. The first one is “Added Bank Accounts”. It will show all the added bank accounts for your refund with bank details. The second one is “Failed Bank Accounts”, which means you added the bank account but pre-validation has failed. The third one is “Removed Bank Accounts”, which means the accounts which you have deleted to refund your income tax.
This is how you can check the bank account linked for your refund.
How to change bank account for Income Tax refund online?
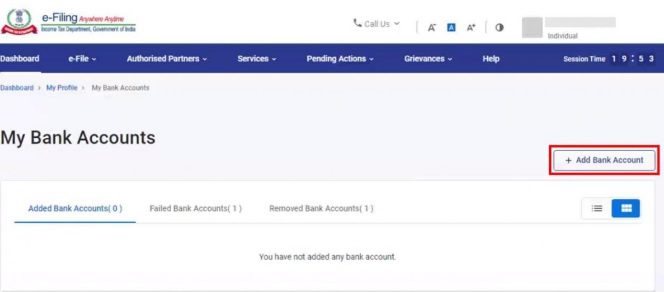
Now let us discuss about how to change bank account for income tax refund online. As usual, log in to the income tax filing portal. Clock on “My Profile” as shown above. Then click on the “My Bank Account” tab. Here, on the right side, you will find a tab “Add Bank Account”. You have to click on that tab.
On the “Add Bank Account” page, enter the “Bank Account Number“, select “Account Type” and “Holder Type“, and enter “IFSC“. The Bank Name and Branch get auto-populated based on IFSC. if your bank is integrated with e-filing, your mobile number and email ID will be pre-filled from your e-Filing profile, and will not be editable. Then click on the validate tab.
On successful validation, a success message is displayed. You will also receive a message on your mobile number and email ID registered on the e-Filing portal.
To validate the bank account, log in to the e-Filing portal using your Net Banking account. On login through Net Banking, the e-Filing portal will verify if the bank account used for login exists under the Added Bank Accounts tab. If the bank account is not already added, a confirmation message with the masked account number and IFSC is displayed, asking you to confirm if you want to add the account to the e-filing portal. Click Continue.
On confirmation (for both methods A and B), the bank account details are included under the Added Bank Accounts tab with the status as follows:
- Validated (if EVC is enabled for any existing bank account) OR
- Validated and EVC enabled (if PAN, Account Number, IFSC, and mobile number are successfully validated by the bank, and if EVC is not enabled for any other bank account).
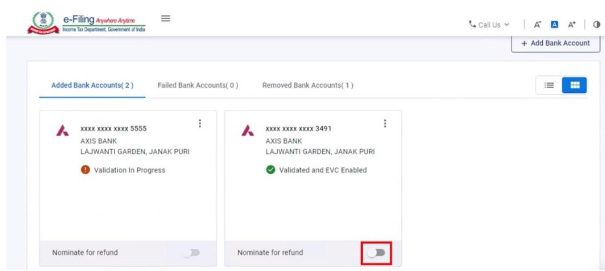
Now you have to nominate the bank to receive your refund. To nominate a bank account for a refund, click the Nominate for Refund toggle/switch (the switch will be positioned on the left) for the bank account you wish to nominate for a refund.
Click Continue to confirm that you want to nominate the selected bank account. On success, the switch will move to the right as below.
In the same way, you can disable also.
By following the above method, you can easily check the bank accounts you have added to your income tax portal, check which bank account is enabled for refund, add or delete the bank account, and also enable or disable the bank account for refund online.


