
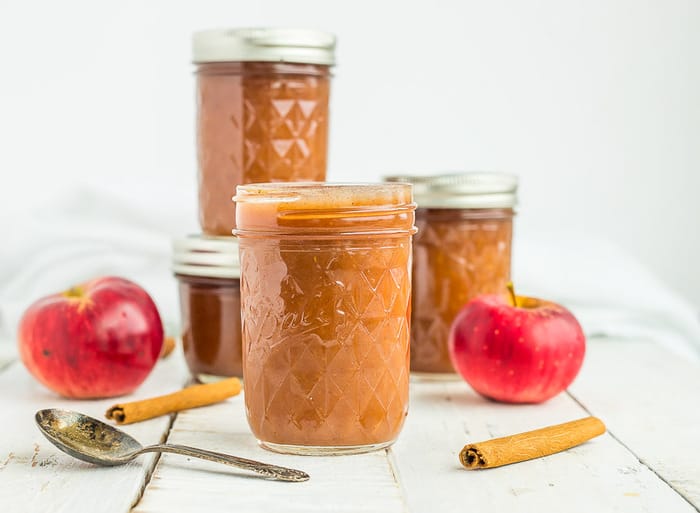

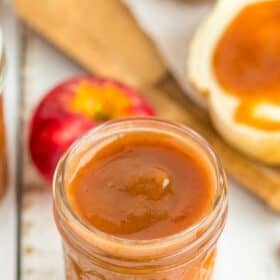
Canning Apple Butter is an amazing way to preserve the apple harvest. This is the best low-sugar apple butter, and it’s delicious on toast, yogurt, muffins, or oatmeal.

As an Amazon Associate, I earn from qualifying purchases.
Homemade apple butter is a classic fall favorite. You can simmer this recipe in a slow cooker all day (your house is going to smell amazing!), make it on the stovetop, or even in an Instant Pot.
This apple butter recipe for canning is suitable for a water bath canner, but I’ll also teach you how to freeze it if canning is not your jam.
The act of canning apple butter is as iconic to fall as canning peaches is to summer. But lucky for you, this crockpot apple butter recipe is a lot more hands-off!
If you want to use homemade apple butter for something extra special, try it in a batch of Cinnamon Apple Donuts.
Apple Butter Ingredients
This recipe uses:
- Apples
- Sugar (optional. See notes)
- Ground cinnamon
- Ground cloves
How to Make Apple Butter
*I’ll walk you through it here with some photos and tips, and you’ll also find a printable recipe card at the bottom of the post with exact measurements, etc. You can also click “jump to recipe” to skip down.
Peel and chop your apples into semi-uniform pieces. Pro tip: you don’t have to peel them but from a food preservation standpoint it does remove additional contamination risk.
I use this apple peeler to make quick work of peeling and coring apples, but a plain ol’ vegetable peeler and a chef’s knife will also work.

Add the apples, sugar, and spices to your slow cooker (I use my Instant Pot with the slow cooker lid).
Set your slow cooker to low for six hours. After the time is up, blend your apples. I use an immersion blender, but you could also transfer the apple butter in batches to a blender or food processor.

Technically you’re done at this point if you’d like to be. Put it in containers and freeze if you’d like. But, if you want to learn to also can it, read on!
How to Can Apple Butter
Prepare your canner by filling it with water. You need to have enough water to cover the jars by 1 inch once the water is boiling.
Set the canner on the stove. Turn the burner to high. Once it reaches a boil, reduce it to a simmer. You want to keep the water hot so that everything is ready when you jars of apple butter are ready to go.
Wash and clean your jars. You’ll want to keep them warm to avoid having them crack when placed in the canner. You can fill them with hot water, or place them on a tray in the oven at 170˚F.
Wash your lids and set them aside in a clean place. You no longer need to simmer lids in water to keep them sterile. Woot!
Ladle in the warm apple butter (I like using a canning funnel), leaving 1/4 inch of headspace. Headspace is defined as the space between the top of the food and the top of the jar. Remove the bubbles from the jar (I use a plastic chopstick).

Use a wet clean rag and wipe the rim of the jars to make sure they are free of any delicious apple butter.
Place a clean lid on the jar, and then a ring, and tighten the ring to fingertip tight (tight enough that it won’t come off, but not so tight that a normal person couldn’t budge it).
Do not add the jars to the canner as you finish filling them. You’ll want to pack the canner all at once to avoid uneven processing.

Bring the water in the canner back to a rolling boil and then lower your jars into the canner using a jar lifter. Put the lid on the canner.
Processing times will vary based on altitude and size of jar. See the chart below. Pro tip: the water must return to a rolling boil in the canner before you can start the timer.
Processing Time for Apple Butter
Once the jars have been processed for the appropriate amount of time, remove the canner from the burner, wearing oven mitts carefully take off the lid of the canner, and allow it to sit for 5 minutes. Pro tip: I tend to just slide the canner into the middle of my stove, as it weighs a ton.
Carefully remove the jars with canning tongs, and place them on a thick towel in a place where they can be undisturbed for 12 hours.
The lids will likely start to pop within 20-30 minutes of being removed from the water. That popping sound is music to your ears, as it tells you that everything has been sealed. It’s a reward for all your work!
After the jars have rested for about 12 hours, press down in the middle of each lid. If it “gives” at all, the jar didn’t seal. Either enjoy it that day, put it in the fridge, or reprocess it.
WHAT IF MY JARS DON’T SEAL?
If you’ve correctly processed the apple butter, and the lids still didn’t seal, you can reprocess them.
Double-check to make sure there are no:
- Chips in the rim of the jar
- Dried apple butter on the rim (anything between the rim and the lid may prevent a seal.
Best practices would involve using brand-new lids for reprocessing. Set aside the old lids to use for dry storage (related: Pantry Essentials for the Home Cook).
If the jars don’t seal on the second attempt, you likely have a bad batch of lids, or your canning process has a step missing. Email me and we’ll try to troubleshoot what is going on.
For unsealed jars, you can place them in the fridge. Eat the apple butter within three weeks. Or freeze for up to 6 months.
Can I Make This Apple Butter Sugar Free?
Yes! This recipe is adapted from The Ball Blue Book Book Guide to Preserving. The original recipe calls for four pounds of apples and FOUR cups of sugar. All the nopes from me!
I have pared it down to only one cup of sugar because it helps keep the final (canned) product fresher for a longer period of time. But, I have canned it before without any added sugar and it is still shelf-stable for 12-18 months.
Now, I never advocate changing up tested canning recipes, but given that you can safely can applesauce with no sugar added, I am completely comfortable canning low-sugar apple butter.
You can also use honey, but please note if you plan to can this apple butter, the high temps for preserving will kill any of the beneficial properties in the honey.
How to Freeze Apple Butter
Apple butter freezes like a boss. You can freeze in your favorite freezer containers, use silicone trays like these Souper Cubes, or even freeze in glass canning jars.
Make sure you use wide-mouth canning jars or jam jars, and leave 1 inch of headspace (the space between the top of the apple butter and the top of the jar).
Allow the apple butter to fully cool in the jars before freezing. To defrost: set the jar out at room temperature overnight.
STORAGE FOR Homemade Apple Butter
Once the jars have sealed, remove the rings. Label and store sealed jars in a cool (best results are 50-70˚F) dark place for up to 12-18 months.
If you have the space available, do not stack the jars on top of each other more than two jars high.
Pro Tips/Recipe Notes
- You do not need to add water to the apple butter while it is cooking. After 30 minutes the apples will start releasing all their awesome natural juices.
- You do not need to add lemon juice to this recipe for it to be safe for canning. The natural sugars in the apples make this recipe safe to process in a boiling water bath canner.
- You can also make this quickly in the Instant Pot if you’d like. Check out Katie’s Instant Pot Apple Butter for the recipe. While the Instant Pot is faster, I love the smell of the apple butter cooking all day in the slow cooker.
- Feel free to adjust the spices to taste. Personally, I see cinnamon as a condiment and tend to keep adding a little bit more throughout the process.
- You can use this base recipe for other types of fruit – apricot, homemade pear sauce, and peach are all wonderful. Cooking and processing times/instructions are the same.
- If you don’t have enough jars to fill the canner, consider Canning Water in a few jars to stock your emergency drinking water supplies.

MORE CANNING RECIPES YOU’LL LOVE:
Canning Apple Butter
Canning apple butter is an amazing way to preserve the apple harvest. This is the best low-sugar apple butter, and it’s delicious on toast, yogurt, muffins, or oatmeal.
How to Make Apple Butter
-
Peel and chop your apples into semi-uniform pieces.
4 pounds apples
-
Add the apples, sugar, and spices to your slow cooker. Cook for 4-6 hours on low with the lid on. You do not need to add water to the slow cooker.
1 cup sugar, 2 tbsp ground cinnamon, 1/4 tsp ground cloves
-
After the time is up, blend the apples with an immersion blender, or transfer in batches to a blender or food processor.
Canning Apple Butter Instructions
-
Prepare your water bath canner by filling it with water. You just need to have enough water to cover the jars by 1 inch once the water is boiling.
-
Set the canner on the stove. Turn the burner to high. Once it reaches a boil, reduce it to simmer. You want to keep the water hot so that everything is ready when the apple butter is.
-
Wash and sanitize your jars. You’ll want to keep them warm to avoid having them crack when placed in the canner. You can fill them with hot water, or place them on a tray in the oven at 170˚F.
-
Wash your lids and set aside in a clean place.
-
Place a canning funnel on top of one of the jars.
-
Ladle the warm apple butter into jars, leaving 1/4 inch of headspace. Headspace is defined as the space between the top of the food and the top of the jar.
-
Remove any bubbles from the jar (I use a plastic chopstick).
-
Use a wet clean rag and wipe the rim of the jars to make sure they are free of any delicious apple butter.
-
Place a clean lid on the jar and then a ring. Tighten the ring to fingertip tight.
-
Using canning tongs, gently place your jars in the canner. Put the lid on, and set your timer. Pro tip: the water must return to a boil in the canner before you can start the timer.
-
Process half-pints, pints and quarts based on the elevation guide below:*0-1,000 ft – Half-Pints & Pints =5 min Quarts =10 min*1,001-6,000 ft – Half-Pints & Pints =10 min Quarts =15 min*6,000 ft+ – Half-Pints & Pints =15 min Quarts =20 min
-
Once the apple butter has processed for the appropriate amount of time, remove the canner from the burner, and carefully remove the lid of the canner (Pro tip: use oven mitts to take the lid off because the steam is super hot).
-
Using canning tongs, carefully remove the jars, and place them on a thick towel in a place where they can be undisturbed for 12 hours.
-
After the jars have rested for about 12 hours, press down in the middle of each lid. If it “gives” at all, the jar didn’t seal. Either enjoy it that day, put it in the fridge, or reprocess it.
-
Once the jars have sealed, remove the rings. Label and store sealed jars in a cool (best results are 50-70˚F) dark place for up to 12-18 months.
- Apples contain enough natural sugar to be safe for canning without added sugar.
- You do not need to add water to the slow cooker. After 30 minutes they’re going to start releasing all their awesome natural juices while cooking.
- Makes 8 half-pints, 4 pints, or 2 quarts.
- Nutrition values are an estimate only.
Stovetop Instructions:
Cook apples, sugar, cinnamon, and cloves in a heavy-bottomed saucepan on low for 3-6 hours, stirring occasionally.
Nutrition Facts
Canning Apple Butter
Amount Per Serving (1 tbsp)
Calories 10
% Daily Value*
Fat 0g0%
Saturated Fat 0g0%
Cholesterol 0mg0%
Sodium 0mg0%
Potassium 12mg0%
Carbohydrates 2g1%
Fiber 0g0%
Sugar 2g2%
Protein 0g0%
Vitamin A 5IU0%
Vitamin C 0.5mg1%
Calcium 2mg0%
Iron 0mg0%
* Percent Daily Values are based on a 2000 calorie diet.
Shop this Post:
(may include affiliate links)
