How to Start a WordPress Blog

I started the website Tried and True Mom Jobs with no previous knowledge on how to create a site or ANYTHING! I’m completely self-taught and believe ME when I say, if I can do it, you definitely can.
I’ve had numerous requests to share the process of how to start a blog, so I am going to share with you what steps to take, free resources to use, and the best way to create a successful blog.
This post contains affiliate links, which means I may receive a small commission, at no cost to you, if you make a purchase through a link.
How to Start a WordPress Blog for Beginners
I did a step-by-step video here along with real figures on how much I earn if you’d like to check it out.
Step 1: Decide what to blog about
Many bloggers write about what they are passionate about. I’m passionate about moms being able to stay home, raise their kids, and make money because it’s what I want and I believe my findings won’t only help me, but can help others too.
Unfortunately, every passion you have won’t make you money. Scrivs from Obstacle.co says the 7 top blog niches that gain the most traffic and make the most money are:
- How to Make Money
- Personal Finance
- Health and Fitness
- Food
- Beauty and Fashion
- Lifestyle
- Personal Development
If you like to travel you have to at least consider a travel blog. I break down how to get it started and make money doing it here.
I have a list of 18 profitable niche ideas here that you can also choose from. You can certainly make money in other niches, but these are just the most popular.
Quick question: Are you on our email list? If you’re a mama like me, you definitely want to be on our list where we send out regular new mom jobs, productivity tips, and inspiration to get through this tough yet awesome journey of motherhood. Click here to subscribe.
Step 2: Choose a Domain Name
You’ll want to really think about this because your domain name is so important. Make sure you consider the following when choosing a name:
- Easy to Pronounce & Spell
- Make it Short (I know, I know my domain name is a little long)
- Easy to remember
Check Namecheap to see if your desired name is available. This is the best (and cheapest) place I found to purchase my domain name, it’s all in the name “Name Cheap”.
Please note: I show you how to purchase your domain name if you have any questions in my step-by-step video in starting a WordPress website in step #4
Step 3: Get Hosting
Now that you know what your domain name will be, it’s time to get started! You’ll need to get web hosting. Why? Look at it like this; web hosting is like having a landlord. To live there (on the web) you have to pay rent but at a very low price.
Update: I used to use Bluehost and SiteGround to host my site but when my traffic continued to grow I switched to BigScoots. I mean, look at how crazy my traffic was this day (MIND BLOWN)
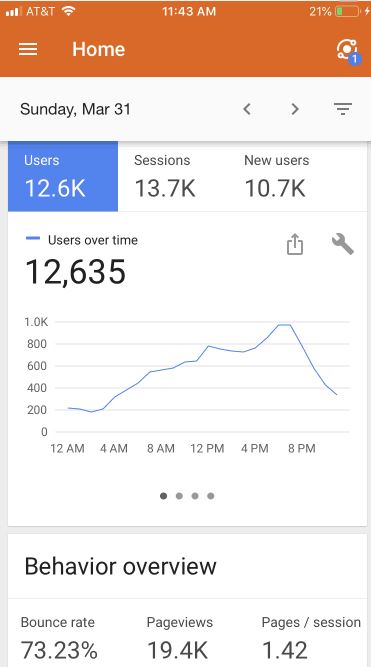
I had 19.4k page views in one day! I now get well over 200,000 page views per month but keep in mind, I’ve been doing this for awhile.
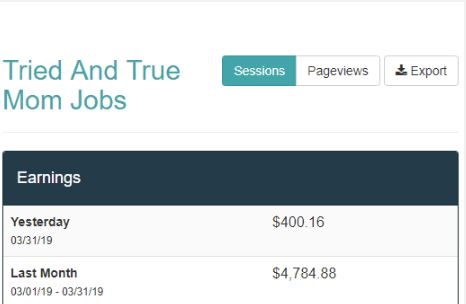
I also made $400 this day from Ad sales which was a great way to end the month with $4,784.88. I discuss this more in my article on How I Make Money Blogging.
Although I had no issues with Bluehost and SiteGround, it was time to move as my traffic grew.
As a beginner, I would recommend starting with SiteGround because it is a bit cheaper than BigScoots and when you’re ready to upgrade, BigScoots does all the work for you transferring your site. SiteGround is also offering a Huge 80% Off annual shared hosting plans. So you definitely want to take advantage of that!
I did a full tutorial on how to set your site up with Siteground but if you choose BigScoots and purchase their WPO managed site they will install your WordPress site for you within a matter of a few minutes, install any new chosen theme you’d like to use and get you all started.
Step 4: Find a Theme (aka Template)
I used the Astra theme to create my site. I recommend checking out my video below at Step 6: time marker 17:20 to see how I customized my website. I created a brand new site in the video below just to show you how easy it is.
Let me know if you have any questions, I know this may seem like a lot but if you take one step at a time it won’t seem so hard.
I highly recommend checking out the themes on Elementor, many of them are free and are awesome.
Step 5: Install Your Theme
You can see how to do this at timestamp 7:30 in the video above, but remember if you choose BigScoots they will do this for you.
Once your theme is installed, the fun begins! You can start writing.
Step 6: Change your Permalinks Settings – DO NOT SKIP THIS STEP
Before you get started posting anything, go to your Settings -> Permalinks -> Choose “Post name” and then save the changes.
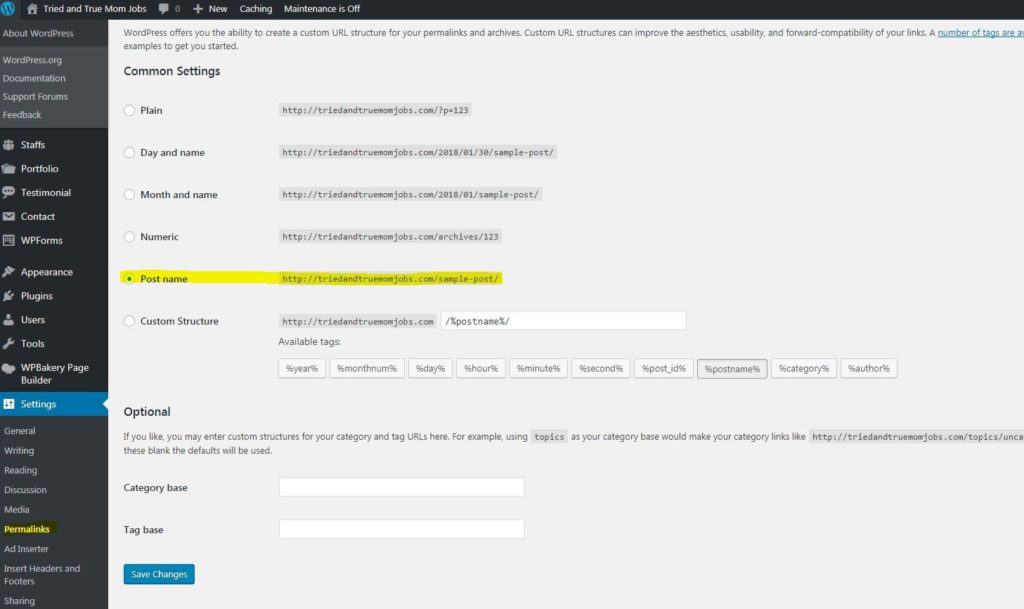
Note: When you write your posts, the permalink “Post Name” should be whatever keyword you are targeting if you are considering SEO.
If you’re writing a list post, i.e “5 of the Best Blog Posts” try to never put a number in the permalink. If the main keyword you are writing about is Best Blog Posts, let that be your post name. So it would look like this, triedandtruemomjobs.com/best-blog-posts.
I cover that part in this video I did on How I Write My Articles to Rank on Google. I think it will really help you understand how to write your articles, especially in the beginning.
Permalinks are permanent URLs for the pages on your site. They should never change, so it’s important to get it right before you start posting.
Permalinks should not include dates because the search engines use words, not numbers to understand what your content is about.
Step 7: Set up your email
Instead of having @yahoo.com or @gmail.com use your domain name. Like mine is [email protected]
I highly recommend integrating your website email account with your Gmail account or whomever your email provider is for a better user experience. Here are the instructions if you have Gmail.
More Tips to Get You Going Before You Launch Your Blog:
- If you’re on Instagram be sure to follow me here. I’ve been asked to share how I do it all with 3 kids and I’m happy to share my tips and tricks with you all!
- Keep it to yourself until after you launch. You’ll be pleasantly surprised how this will add value to what you’ve done. You will need others to bounce ideas off so create a small circle of positive minds and keep it small. You already have yourself that will give you doubts.
- Join the Facebook group Blogging Like We Mean it for encouragement, support, and to stay updated on what’s going on in the blogging world. My site went haywire one day and I went to this group and told them what happened and they quickly helped me get it fixed for FREE!
- Try and have at least 10-20 posts already on your site before you launch, you’ll want to look established.
- Check out Darren’s Step-by-Step Process on How to Write a Blog Post and then see how I write my articles to rank on Google here. If you master these two formula’s then you’re a rockstar!
- Use your competition as a helpful guide for popular topic ideas, see the tools I use in my article on how to make money blogging.
- Chop your paragraphs up for readability, no one wants to read a big block of text. You shouldn’t have any more than 2-3 sentences before you need to make a break/return.
- After you post your article always read it again on mobile to see how it looks because most people use their phones to read articles.
- ALWAYS keep your readers top of mind when writing. I constantly ask myself, would my reader want to know this, would they really care about that? and I always ask myself at the end of the article did I fully answer the question or cover the topic I’m writing about. And your answer should always be Yes.
- Look for the best opportunities to monetize your site through affiliate marketing, ads, sponsorships, and the list goes on.
- When you add pictures to your website, make sure you save the file for whatever keywords you want people to find your content. I wish I’d known to do this earlier.
- Create a Privacy Policy and put it in your footer, you can use mine for reference.
- Install Google Analytics to track the activity on your site.
- I worked with a graphic designer on Fiverr to create my logo for $10. Venom_hunt on Fiverr does AMAZING work, I wish I had used him when I was creating my logo. Mine is very plain, but I like it. You can also try logo ideas out on Tailor Brands, it’s very cool to see your logo come to life especially when you don’t know what you want.
The FREE tools I use to help manage my site:
Please note: I’ve updated the plugins I use for my website in this video so MAKE SURE you check it out here.
- Images: I use free stock photography websites like pexels, unsplash, stocksnap, and pixabay.
- SEO: Yoast
- Social Plugin: Sassy Social Share
- Email Campaigns & Capturing Emails: Mailerlite
- Creating Blog and Pinterest Images: Canva and Microsoft PowerPoint
- Proofreader: Grammarly – this is a great tool catching most of my grammar and spelling errors (most of the time, sometimes it’s wrong)
- Broken Link Checker: This plug-in has saved me many times because links often change and there is no way I’d know that without this plug-in.
- Strike Out No Follow Links: This Google Chrome extension is great! It helps you figure out what Affiliate links your competition is using as long as they aren’t using a plug-in like Pretty Links or a tool that makes all of their links no-follow, but I can show you how to get around this.
Once your website is live, update Google Search Console. This is something you definitely want to do and here is a step-by-step tutorial that will help you set this up.
I have completely enjoyed creating my website, and I’m sure you will too, it is very rewarding.
If you have any questions about starting your website, pop me a note in the comment section below…I’m happy to help!
Make sure to join our FREE mompreneur tribe on our exclusive email list. Where we send out new mom jobs, financial tips, and more! Subscribe here.
You Might Also Like
How I use Pinterest to Drive Massive Traffic to my Website
How to Easily get Followers and Make Money at the Same Time
6 Affiliate Programs that Make April $6,000 a month!

